Blog
The Maggie Sew & Win!


Fabric Love - Fort Firefly by Birch
Today we are featuring another line from Birch Organics - Fort Firefly! Fort Firefly is a whimsical line that we simply adore. Designer Teagan White has created a work of art on organic cotton!

Fort Firefly features exquisite prints that remind you of summers gone by chasing fireflies, skipping through meadows and making flower crowns. You can almost smell the campfire when you create with this collection! The rich colors are perfect for year round wear and we particularly love the soft organics for children's clothes.
Here are a few up close pictures of the collection:

Penny's Garden
Fireflies Mineral
Firefly Jars Gold

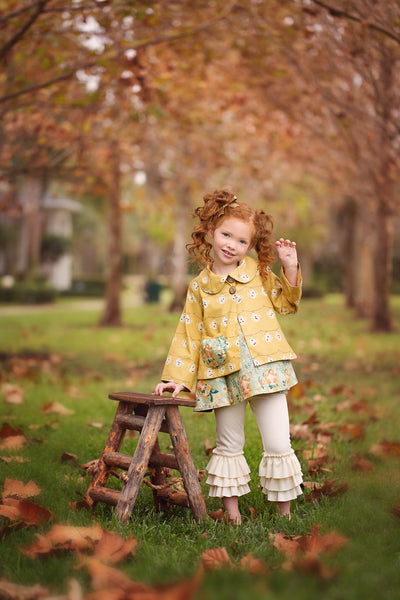
We recently used Fort Firefly for a Violette Field Threads photo shoot. We made the Lilly Belle Pinafore out of the Penny's Garden print in Mineral and the Molly Jacket out of Firefly Jars in Gold. The set could not possibly have been any more perfect. Here are some of the photos from the AMAZINGLY talented Sandra Bianco Photography with her adorable model Sophia!
Would you like to create the look above?! One winner will receive Fort Firefly Fabric; Penny's Garden in Mineral and Firefly Jars in Gold. They will also receive the Molly & Lilly Belle Violette Field Threads Paper Sewing Patterns to recreate our look! Enter below to win!!
We {Heart} Handmade Gifts - Pajama Sets! - Week 2


Click on pictures above to purchase the Audrey & Lucy Patterns
Fabric Recommendations:


Fabric Requirements:
Lucy Pants:
Note: We are creating a modified Lucy Pant that is full length with no ruffle. Please use the below chart rather than the one on the pattern.| 2T | 3T | 4T | 5 | 6 | 7,8 | 9,10 |
| 3/4 yd. | 3/4 yd. | 7/8 yd. | 7/8 yd. | 7/8 yd. | 1 yd | 1 5/8 yd. |
Audrey Top:
Use the fabric requirements chart provided in the pattern. Even though, we are shortening the dress to a top length, do not reduce the yardage called for. The extra yardage will be used as the accent fabric used on the bottom as a cuff on the LUCY pj pants.
We are going to start by sewing the LUCY pajama pants.
Pants Cutting Instructions:
1. Cut the Lucy Front & Back pattern pieces in your desired size.
2. Fold the pre-washed flannel in half with the right sides touching and iron flat. This will allow you to cut mirrored pattern pieces.
3. Pin the pattern pieces to the flannel fabric towards the top. The current Lucy pattern piece is for a capri length pant, a ruffle is added to make them full length pants. For the pajama pants we want a full length pant without a ruffle. To achieve this you must add the full length ruffle measurement (minus 2" for the cuff) to the pant leg.
For example: If you are sewing a size 6 pant you would extend the pant leg an extra 8". This will allow for a 2" cuff at the bottom of each full length pant leg.
Creating the Front & Back:
3. Follow the Lucy Instruction through step #5 of the PDF Pattern. At this point your pants should be sewn together along the inseam and turned so that the front pieces are to the front and back pieces are to the back with the right sides still touching.
Creating the Cuff:
1. Cut out two cuff pieces. Each piece will be 6" x 20".
2. Open up one pant leg.

3. Place one cuff piece over top of the open pant leg with the right sides touching and the raw edges lined up. (Trim off any extra fabric that overhangs the right or left side edge.)
4. Sew the cuff to the pant leg. Trim off 1/2 of the seam allowance and turn the cuff down.
5. Working on the wrong side of the pant leg, iron the seam allowance down toward the cuff. Turn the raw bottom edge of the cuff up 1/2" and iron flat.
6. Fold the cuff up in half until the folded edge covers over the seam allowance. Iron flat and secure with pins.

7. Fold the pant leg in half with the right sides touching and pin together along the open side edge. You will pin from the top raw edge all the way to the cuff bottom.
8. Sew along the pinned seam. For a professional look, finish seam with a serger or trim off half of the seam allowance and finish with a zigzag stitch.
9. Repeat steps 1-8 of Completing the Cuff for the opposite leg.
10. Finish the waistband according to the Lucy Pattern.
Now it is time to sew the AUDREY pajama top. You will sew the Audrey top exactly as the pattern requires, so open up that tutorial and get started. Remember, though, your fabric will be shorter than your pattern piece (because you've already used it for the bottom cuff on the LUCY pj pants). The Audrey top will end up being 6" shorter than the dress.
You have now created an adorable pajama set!
The girls LOVED them! They thought they were cozy and comfortable.

Look at those toes. ;)

Reading bedtime stories.


After their stores, the sugar from the cookies & milk started to kick in... I let them have one last hurrah before lights out!

Don't have Audrey & Lucy? Get them both for a *special* promotion... both patterns for $13... That's 40% off list price.
(Pretty much the biggest discount we ever do!)
Enter the code: pajamas
at checkout, and voila! You'll be on your way to making these sets in no time!
*********************************************
Remember that giveaway we mentioned at the beginning of the post?
We're giving away BOTH a $25 gift card to Joann's to buy your flannel fabric/supplies & the Audrey/Lucy patterns!
You'll be able to make 2 sets of pj's.... maybe one to keep and one to gift!
Enter below:
We {Heart} Handmade - Tea Towels - Week 1
We are very excited to introduce you to our new 4 week blog series: We {Heart} Handmade! Each week we will be posting a *new* free tutorial for gifts, home decor, clothing and accessories - and a giveaway to boot!

Let's get started with our first tutorial: Tea Towels.
We absolutely love all the fun tea towels from Anthropologie. We actually each own a few ourselves. If you were to purchase an embellished set of 3, it might set you back between $60-$80.

Now, you're crafty, right? Even if you're doubtful, this tutorial is for you! Keep reading, and you'll learn how to create your own original set of 3 for a fraction of the price, using embellishments you probably already have lying around your workspace.
Tea towels make for adorable hostess and housewarming gifts! They're so customizable, you can make them to fit any gal's style.
We will be making a set of three tea towels; in saturated, bold colors.
Fabric Recommendations: The tea towel itself should be made from a light to medium weight linen as this fabric is durable enough for kitchen use.
Supplies: 3 linen rectangles that are 22" wide by 27" long. We used Kokka linen for our tea towels. We love the weight of the linen and all the fun mix and match prints and saturated colors. The three we have picked are:
- Kokka - Echino Butterfly in Blue
- Kokka - Echino Nico Patchwork in Multi
- Kokka - Echino Nico Bicycles in Pink


Cut your fabric down to size. The fabric should be 22" wide x 27" long. Note:If you purchase 3/4 yard of fabric you can create two towels. So you can make one for you and gift one to a friend.
Creating the Ruffled Tea Towel:


Creating the Pom-Pom Tea Towel with Squirrel Applique:
2. Sewing the Squirrel Applique:
- Print the squirrel applique Here.
- Cut the squirrel out of coordinating fabric. (If you don't want the squirrel to fray, you can back her with interfacing before attaching to the tea towel.)
- Embellish as desired (We sewed a bow around this neck).
- Pin the squirrel to the tea towel. We recommend pinning her off center about 6-9" from the side edge.
- Sew around the applique.


Creating the Ribbon Tea Towel:


Biggest (and last) Sale of the Year!!!
That is right! Do not miss out on 35% off sitewide!! Every pattern is 35% off, PDF and Paper Patterns now through Monday, December 2, 2013.


Ericka & Jessica
Sewing with Knits for Beginners (and a giveaway)

Row 1: Gretchen, Phoebe, Gretchen, Adele, Phoebe, Lilly Belle
Row 2: Madelyn, Elise, Kate, Phoebe, Olive
"I would love to make that, but I do not know how to sew with knit!"
We can't tell you how often we've had that said to us... Do you feel the same? Does sewing with knits feel intimidating? You're not alone if it does! But sewing with knits is so easy! You just need to know a few things before you start.... we are here to tell you, your mind is about to be eased and a whole new world of sewing is about to be opened up!!

This blog article is designed to take the mystery out of knit...
You'll know:
- How to pick which type of knit fabric is best for your garment
- What type of settings to put your machine on when sewing with knit
- Tips to make a fabulous finished knit garment
Knit fabric comes in various forms, here are a few of the most common forms:
-
Jersey Knit - Jersey can be blended out of cotton, rayon, polyester and silk. Jersey knit is also usually blended with a bit of spandex, as this is what helps it to stretch and bounce back to the original shape. Jersey knit has a distinct front and back, with the smooth side on the front side of the fabric, and a more textured back side. When cut, jersey knit tends to curl at the edges, which can make it a bit more tricky to work with. This knit is great for skirts, tops, yoga pants and dresses.


Jersey Knits from Girl Charlee
Here are some examples of patterns we've sewn using Jersey knits:


Madelyn top pattern, Gretchen cardigan pattern, Olive top pattern
- Interlock Knits - Interlock is thicker than jersey knit, as both sides of the fabric are smooth, like the right side of a jersey fabric. Interlock is SUPER easy to sew with because it doesn’t stretch out of shape as easily as jersey and it doesn’t curl at the edges. We find Interlock as easy to sew with as any woven cotton! Because it is a more stable fabric, and is a breeze to work with, it is one of our preferred types of knit! This knit is great for skirts, tops, yoga pants, and dresses.


Colorful Rabbits, Hot Air Balloons, Mustaches
(just a sampling of super creative and fun interlock knits available at www.spoonflower.com)
Here are some examples of patterns we've sewn using Interlock knits:

Phoebe top/dress, Brooke riding pants, Gretchen cardigan

Interlock Knits from Spoonflower, from left to right: Yellow Dot, Cameo Pink Roses, Blue Vintage Hot Air Balloons, Cameo Rose Dots
-
Rib Knits - Rib knit has the ribbing on both sides of the fabric. Rib knits tend to be very stretchy when pulled perpendicular to the rib. The ribbing can come in a variety of sizes from large ribs to baby ribbing. If you envision the neck of a t-shirt, this part is usually made with Rib knits. This knit is popular for cuffs and bands because of the elasticity. We don't really use rib knits often, but they certainly are fine to use!


Fabric.com
Here we've sewn the Adele dress using Rib knit:


Adele dress pattern
-
Slinky Knit - Slinky knit is an acetate-lycra fabric with ribs that is very stretchy and does not wrinkle. This knit is great for wrinkle free dresses that are light weight. We don't recommend slinky knit for any of our patterns that feature ruffles, because it isn't able to hold the weight of ruffles well at all. This type of knit especially wouldn't be good for the Phoebe dress, because the weight of the skirt portion would weigh the top portion down. This is a knit that we don't ever really use and we don't recommend it for our patterns.
Now that we've discussed the types of knits that are great to use, let's take a look at sewing machine settings and other sewing tips!


you sew, as this will prevent your garment from losing its shape.
Fabric Love - Birch Organics
What is even better than beautiful fabrics? How about beautiful fabric that is eco-friendly!! This is one reason why we are so excited about our featured fabric company, Birch Fabrics.
Birch fabric is an amazing company that is on the cutting edge of trends while at the same time staying true to their roots of being environmentally friendly. The cottons are so soft and strong to work with, they are truly perfect for sewing clothing. They also offer many prints in Home Decorating weight and have just rolled out a not to be missed line of Knits.
Check out some of these gorgeous prints:
These would be sure to please both boys and girls!!
Image courtsey of www.behomemade.com
We adore the line Yay Day by Emily Isabella, the colors would be beautiful year round.
Birch also has some of the most unique and cool Basics lines around!
Mod Basics 2 - Deer
Mod Basics 2 - Bird Spokes
We were able to make our new Kate Dress out of Birch Organics and we absolutely loved the results. They are so many prints to mix and match.
Would you like to try some Birch Organic Fabric??!! Well Vivienne Rose Fabrics is donating 3 yards of Birch to one lucky Blog Reader!! The Winner can choose any print they like from Birch section in their shop :)
Enter below:
Fabric Love - Amy Butler Cameo Voile
It has been too long since we had featured a fabric we love!! So today we have some especially gorgeous fabric to share with you! You may have heard of the designer, Amy Butler?? Hahaha, of course you already know and love the amazingly talented Amy Butler!! She is quite possibly one of the most well known and beloved textile designers in the sewing/quilting world. Her collections are always perfect!

Today we are featuring her Cameo fabric Collection. This collection is so beautiful with all the saturated jewel tones and detailed patterns.

The Cameo cotton collection is so soft and beautiful, but we are particularly in love with the Voile Cameo prints. They are perfect for summer sewing. Cotton Voile is light, soft and airy. The prints are delicate and perfect for clothing.
The always amazing Kelly Roper of Kelly Roper Photography took these gorgeous photos of our very own Cosette Dress made out of Cameo, Josephines Bouquet in Voile. Are they not just dreamy!!?!?


Would you like to recreate our look? We are teaming up with Vivienne Rose Fabric and giving away the Cosette Maxi Dress Pattern and 4 yards of Amy Bulter Cameo, Josephine's Bouquet Voile Fabric.
Two second Place winners will receive a $20 gift certificate to Vivienne Rose Fabrics. Enter below!!
Stella - Free Tutorial and Giveaway - Add an Extra Shoulder Strap
One of our first and favorite patterns is the Stella One Shoulder Sundress.
It has so much charm and is perfect for our hot Southern Summers. We've been waiting for Summer so we could share this *free* tutorial addition with you all!

(Fabric: left dress: Echino Cycling in Citron & Kikka Green / right dress: Echino Cycling in Pink & Kikka Pink)
We have noticed a new trend lately of an addition of a small strap on the opposite shoulder of "one shoulder" dresses. We think it's a fabulous optional addition, so we created this free tutorial on how to add an additional strap when making the Stella dress.
This extra strap not only gives the dress a bit more coverage for a more casual and playful look, but also allows for more ease of fit when the child you are sewing for is not around. The fit doesn't have to be quite as snug, because the additional strap holds up the zipper side.
Take a look at how cute these little beauties are sporting Stella with the additional strap!

Please Note: This tutorial is an add-on for the Stella Dress Pattern. If you have previously purchased the pattern, then simply follow the steps below to create the extra strap. If you have yet to buy the original pattern, you can purchase it HERE. We are also giving away the Stella PDF pattern to 5 lucky winners! (Enter below)
Tutorial:
Follow the original PDF pattern up through step #5 and then follow the below steps.
1. Cut out four shoulder strap pieces. You will cut the new pieces using the existing shoulder strap pattern piece, however you will need to add 3" to the length.
2. Place two of the shoulder strap pieces together with the right sides touching and pin. Sew them together along the raw edges of three sides, leaving one short end open for turning. Trim the seam allowance, clip the corners and turn right side out. Iron flat. Repeat for the remaining two shoulder strap pieces.

3. Pin the shoulder strap to the the bodice front along the top raw edge. The strap should be placed approximately 3 1/2 inches away from the zipper side edge. Note: Depending on the size you are sewing, this measurement could slightly increase or decrease. Measure how far the strap on the shoulder side is from the edge and mimic this on the zipper side. You don't want the strap on the zipper side to be too close to the edge, or it will be constantly falling off her shoulder when sewn in. The strap should be placed at an angle so that it is crossing over the bodice front diagonally. This will create a straight strap once sewn.

4. Continue following the tutorial starting at step #6.


5. Repeat steps 1-3 for the back bodice strap. Yay! You've added an additional strap! How EASY was that??????
We hope you love this addition to the Stella dress. Doesn't it make the Stella even more sweet and versatile?
Here are some more adorable shots of The Stella Sundress with optional strap!!!!


Ack! The adorableness of this photo shoot has us swooning! The amazingly talented Corrie Collier took these photos of her little darlings for us, and we were beyond thrilled!
After sewing the top of Stella for this tutorial, I had to finish the dress for my own little cutie (even if it meant staying up super late, haha!). All because the next day we were planning on going strawberry picking at one of our local "You Pick" strawberry farms. My daughter loved her new dress! Here are some pictures from our fun day in the sun.


Do you love the new optional strap? Leave us some love below!!!
Enter to win the Stella PDF below. 5 of you lucky ladies will win a copy!
Spring Pattern Giveaway!!
We have released 8 amazing patterns for Spring 2013!! Have you sewn any of them? Would you like to have them all?? Well now is your chance! We are giving away all 8 PDF Patterns to 3 lucky winners!!!

Here is a peek into all 8 of these gorgeous designs:
Bridgette! Bridgette is a one-shoulder, polished party dress with attached tulle pettiskirt.

Cosette! The new Maxi dress in town, features a pleated bodice and cascading flutter sleeves.

Ellie! This pattern set includes a fun tulle skirt that pairs perfectly with stretch lace leggings.

Estelle! This tailored tulle skirt features a flat front and back waist and is our first pattern for Women.

Emmaline Misses! Our most popular pattern, and most requested version, sized up for Women.

Lilly Belle! This reversible Pinafore and leggings set should be a staple in every closet.

Madelyn! This collared top is easy and adorable, made from knit OR cotton!

Scarlett! Scarlett has an interchangeable top skirt to mix and match with the bottom petti-skirt, not to mention the cutest legwarmers ever.

So are you ready to start sewing!!?!? Enter below for your chance to win all 8 PDF Sewing Patterns!!!
Looking for some fun fabric to get sewing with? Vivienne Rose Fabrics, one of our blog sponsors, has 20% off the whole shop now through Tuesday 5/28/13. Head over Vivienne Rose Fabrics and shop today! Also find us on Patchwork & Quilt!


