How to make Fabric Curlers!
I love the look of bouncy curls, but neither myself or my daughter Cairo have any natural curl to our hair. We resort to curling irons and hairspray to get the look. Cairo loves for me to put her hair up in rollers for the night, but the next morning the curls are always a bit frizzy and tight, not to mention her sleep was not as good as usual due to the plastic clips.
I saw the coolest fabric rollers on pinterest and decided to try and make a pair for Cairo and myself to try! What a fun project it turned out to be! The curlers are easy to make, cute as can be and they work!!
Here is how i made a set of nine fabric curlers:
Materials:
- 1/2 yard of fabric (or scraps from several prints)
- 9 -1/2" buttons
- Sewing machine with a button hole function
- Brown Rice or Poly/fill for stuffing
1. Create a rectangle paper template for the curlers. I started with a 10" x 5" rectangle, this made a large curler perfect for long thick hair. If you have fine or shorter hair then i would use a 10" x 3".
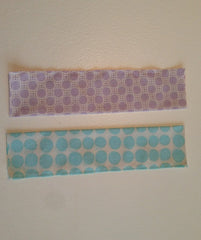
2. Cut out the fabric rectangles. We used Amy Butler Gypsy Caravan and Sun Spot for our curlers.

3. Fold the rectangles in half with the right sides touching and iron flat.
4. Sew the curler closed across the long open edge and one short end, leaving the opposite short end open for turning. Trim off 1/2 the seam allowance.
5. Turn the curlers right side out and iron them flat.
6. Sew a button onto the sewn short end of each curler. The button should be centered and right next to the finished edge.

7. Stuff the curler with either poly/fill or rice*. You will fill the curler up to the halfway point or approximately 4".
**We chose to fill our curlers with rice, not only is is soft to sleep on but it will maintain its shape longer than the polyfill. Rice curlers can also be heated in the microwave for warmth or you could add some essential oils like lavender.

8. Sew down the curler at the halfway point. This will keep the rice on one side and allow you to create the strap on the opposite side.

9. Turn the raw end in 1/2" and iron flat.

10. Sew around the curler strap, thus closing the open end.

11. Sew buttonholes onto the strap. The buttonhole should be close to the finished edge and centered to match the button.
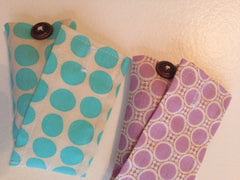

12. Now you have made fabric curlers!!
The curlers can be used just like a store bought set. We washed Cairo's hair and then let it dry about 75%, put a little mousse in it and separated it into sections to roll. Starting at the end, roll each section around the round stuffed part of each roller, when you reach the base, close the strap across each roller and button to close.
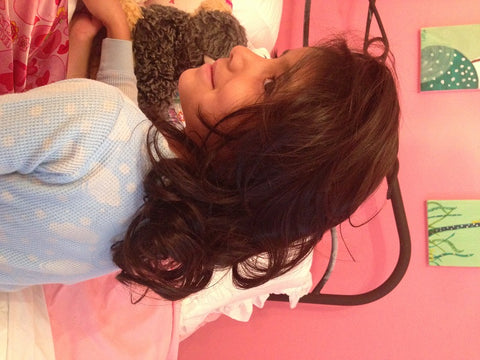
Cairo slept in her set last night, she said they were very comfortable and only one slipped out during her sleep. Today she has bouncy curls and lots of volume. I am going to make her a smaller set to create more spirals.
Have fun creating a set for you and feel free to share this tutorial with your friends!!
I’d love to know if a certain type of fabric works better to form the curl than others? That is, quilting cotton vs. woven poly cotton blend vs. knit cotton lycra… any tips?
How do these work? I have never used commercial curlers before.
These are amazing. I normally do my curls by putting a stretchy hairband round my head and wrapping my hair into it. It’s also pretty soft to sleep on, but not as pretty as these
www.calascrafts.blogspot.com
So cool!! Thanks for the tutorial!
Leave a comment