Isobel Misses Pattern Hack {How to create a Top}

Isobel Tween and Misses are finally here!!! Isobel (in Baby and Girls) is one of our best selling and most loved patterns of all time and we are so pleased that it is now available in our entire range of pattern sizes. Isobel is a dress pattern with loads of options that can be mixed and matched to make the perfect summer dress.
When sewing up my 3rd or 4th Isobel, I realized that I really needed to alter this into a top for myself. As much as I love a cute summer dress, I tend to gravitate towards tops for day to day wear. Therefore, the Isobel Top pattern hack was born..hahaha!! (Scroll to the End to find the hack for the Doll version as well!)

In case you were wondering, yes, I absolutely had "Watermelon Sugar High" stuck in my head for days after sewing this top. Seriously though, how cute is this fabric?!? I picked it up from Alyssa May Design. She has a wide variety of apparel fabrics and super fun prints.

The Isobel top features a button up front and peplum bottom ruffle. You can still use either the bodice ruffle or flutter sleeve options on the top. This top is so simple to make, the hardest part will be deciding how many you realistically need in your closet!
Let's get started:
1. Print and cut the Bodice Front, Bodice Side Insets and Bodice Back pattern pieces out according to your size.
Note on sizing: Isobel has 1 1/4" ease at the bust and 1 3/4" ease at the waist. When sewing the dress option, sizing down (to have less ease and a more fitted look) is optional. Reducing the ease is a straight forward alteration, as the back closes with a zipper. For this top hack option, I recommend either sticking with the eases given in the pattern, or ONLY reducing the waist ease. Without sufficient ease at the bust, the button up front will most likely gape open.
2. We are going to make a few small adjustments to these three pattern pieces:
- Bodice Back - The back is closed, and will not have a zipper. Measure in from the back center seam 1/2" and draw a line. Then measure up 3/4" from the bottom edge, to shorten the pattern piece and draw a straight line. The bodice back pattern will now be Cut 2 on the fold {one main, one lining}.

- Bodice Front - Add some width to the front center line to accommodate for the button front opening. Tape some paper to the front center and measure over 1 1/4" and draw a line. This will allow for 1/2" seam allowance as well as the front overlap. It also gives a touch more ease to prevent any potential gaping at the bust once buttoned. Then measure up 3/4" from the bottom edge, to shorten the pattern piece and draw a straight line. The bodice front pattern piece will now be Cut 4 {two main mirrored, two lining mirrored}.

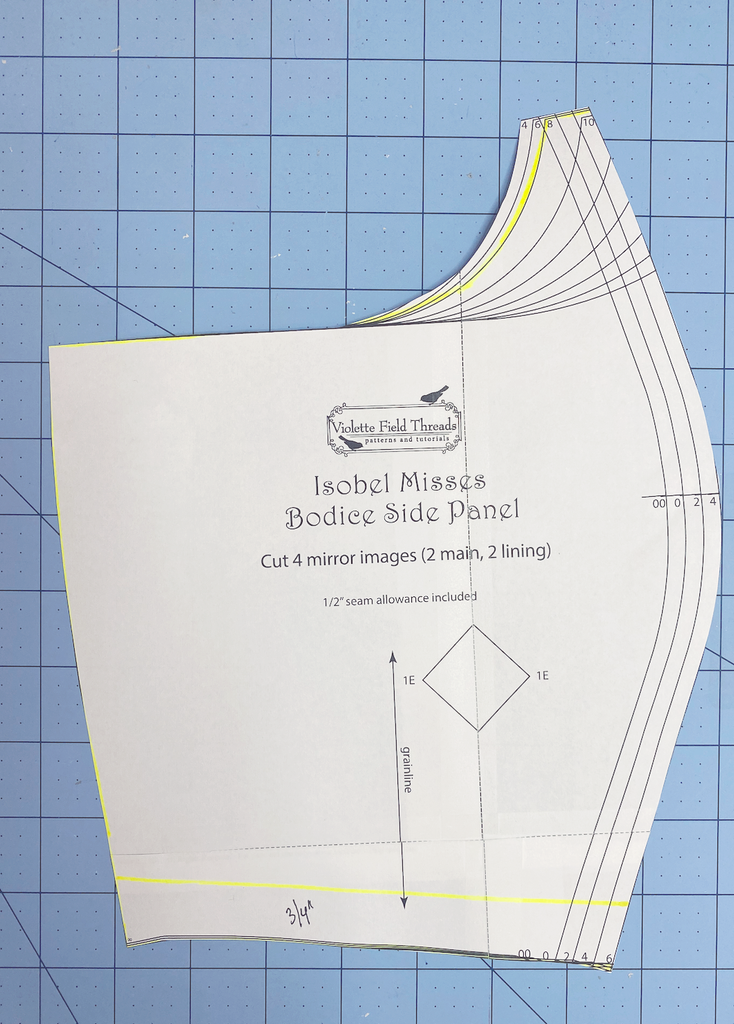
- Bodice Side Insets - Measure up 3/4 from the bottom edge, shortening the pattern piece and draw a new straight line.

3. Cut the pattern pieces out around all your new lines and then use them to cut out the main and lining fabric.
4. Begin following the Isobel tutorial to create the Bodice, sewing Bodice Ruffles or Flutter Sleeves if desired. *When you are sewing, remember that the tutorial shows the Bodice Front as solid, and the Bodice Back split in two pieces. This is so a zipper can be installed in the back. For this hack, the Bodice Front is split in two pieces and the Bodice Back is solid. The instructions remain the same, but the tutorial pictures will look a little different.
5. Once you reach step #21 of the tutorial, remember that you are now pinning around the back neckline, around the shoulders, across the front neckline and down both of the front middle seams.

6. Once sewn, but before turning right side out, we recommend applying a 1" wide strip of fusible stablizer to the wrong side of the bodice lining right next to the center seam. This will assist in ease of buttonholes and buttons later.

7. Trim off 1/2 of the seam allowance and clip into the corners, being careful not to cut the stitch line. Turn the bodice right side out and if desired, top stitch up the front middle seam and around the front and back necklines.

Creating the Peplum Ruffle:
8. Follow steps #23-25 of the Isobel tutorial to finish the bodice. Lay the bodice out in front of you with the front edges lining up. Measure along the bottom edge of the bodice. You will use this measurement to determine the width of the ruffle.

a. Write down the measurement across the bottom of the bodice. The example in the photo measures 16".
b. Multiply that measurement x 2. So my ruffle will be 16 x 2 = 31" wide. You will be cutting 2 ruffles.
Use the below chart to determine the height of the ruffle:
|
Tween Sizes |
|||
|
10 |
12 |
14 |
16 |
|
5 1/8” |
5 ¼” |
5 3/8” |
5 ½” |
|
Misses Sizes |
|||||||||||
|
00 |
0 |
2 |
4 |
6 |
8 |
10 |
12 |
14 |
16 |
18 |
20 |
|
5 ½” |
5 5/8” |
5 ¾” |
5 7/8” |
6” |
6 1/8” |
6 ¼” |
6 3/8” |
6 ½” |
6 5/8” |
6 ¾” |
7” |
Example: If you are sewing a size 6 Isobel Top, you will cut two ruffles that are 31" wide x 6" tall.
9. Cut one of the ruffles in 1/2 widthwise to create two front ruffles. You will now have two front ruffles and one back ruffle.

10. Place the two front ruffles on top of the back ruffle with the right sides touching and the raw edges lining up. Pin together along the short side edges. Sew along the pinned seams. For a professional look, finish the seams with a serger or trim off 1/2 of the seam allowance and finish with a zig zag stitch.

11. Hem the bottom raw edge of the ruffle. Turn the edge up 1/4" and iron flat, then turn up another 1/4" and iron flat. Sew right along the folded edge.

12. Finish the raw short ends. Turn the ends in 1/4" and iron flat, then turn under another 1/4" and iron flat. Sew right along the folded edges.

13. Sew two rows of gathering stitches along the top raw edge of the ruffle. Mark the center of the ruffle with a pin.

14. Lay the bodice out in front of you and mark the center of the bottom edge of both side panels. These marks will serve as the side seams.

15. Gather the ruffle up until it is the same width as the bodice. Place it on top of the bodice with the right sides touching and the raw edges lining up. Match up the center of the back ruffle with the center of the bodice back and pin. Then match up the side seam and pin. Finally, match up the finished edges of the ruffle with the finished edges of the bodice front center seams.

16. Sew along the pinned seams. For a professional look, finish the seam with a serger or trim off 1/2 of the seam allowance and finish with a zig zag stitch. Iron the seam allowance up towards the bodice and topstitch if desired.
17. Mark for button holes on the wearers right side of the bodice front. The front will overlap 1". We recommend using 4-5 buttons and placing them on the bodice only (not the ruffle). Place the first button 1/4"-3/8" down from the finished top edge and space the remaining buttons evenly.

17. Sew the button holes using your sewing machine. Open the button holes. If you are using a seam ripper, be sure to place a pin at the top of each button hole, so you do not accidentally rip the garment.

18. Overlap the front center bodice by 1" and mark for buttons. Sew the buttons either by hand or with your machine.

That's it!! You have now created an Isobel Top!!

This top is going to quickly become your summer staple. Please be sure to post them in the FB group and Instagram and tag us in your post!


xoxo,
Ericka/VFT
Edited to Add:
The Amazing Caroline Gehman has created this hack for the doll version of Isobel as well!


Leave a comment